
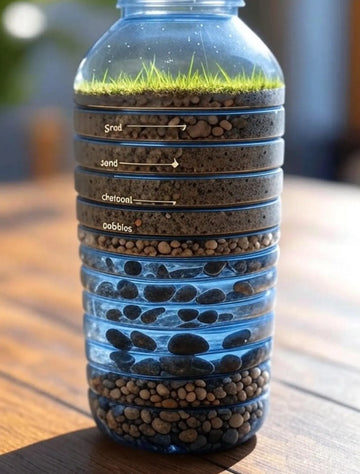
A Wilderness Water Filter can be one of the most important survival skills in your talent arsenal. Learn how to make a wilderness water filter by following these few easy steps.
Step-by-Step Guide to Making a Wilderness Water Filter
First, gather your Wilderness Water Filter materials to create your water safety plan.
1. Gather Materials:
• Find an empty plastic water bottle.
• Collect sand (fine grains), pebbles (small stones), grass, and charcoal (from a fire pit or campfire).
2. Prepare the Bottle:
• Rinse the bottle to remove any residue.
• Cut off the bottom of the bottle using a sharp rock or knife, creating an open top.
• Rinse the bottle to remove any residue.
• Cut off the bottom of the bottle using a sharp rock or knife, creating an open top.
3. Create the Filter Layers:
• Place a layer of grass at the bottom (inside the bottle neck, which will be upside down) to act as a natural strainer.
• Add a layer of charcoal (about 2-3 inches) to help remove impurities and odors.
• Add a layer of sand (2-3 inches) to filter out smaller particles.
• Top with a layer of pebbles (2-3 inches) to hold everything in place and filter larger debris.
• Place a layer of grass at the bottom (inside the bottle neck, which will be upside down) to act as a natural strainer.
• Add a layer of charcoal (about 2-3 inches) to help remove impurities and odors.
• Add a layer of sand (2-3 inches) to filter out smaller particles.
• Top with a layer of pebbles (2-3 inches) to hold everything in place and filter larger debris.
4. Set Up the Filter:
• Invert the bottle (neck down) over a container to collect filtered water.
• Ensure the cap is off or loosened to allow water to flow through.
• Invert the bottle (neck down) over a container to collect filtered water.
• Ensure the cap is off or loosened to allow water to flow through.
5. Filter the Water:
• Pour water slowly through the top (open end). Let it drip through the layers into the container.
• Repeat the process 2-3 times if the water still looks cloudy.
• Pour water slowly through the top (open end). Let it drip through the layers into the container.
• Repeat the process 2-3 times if the water still looks cloudy.
6. Safety Note:
• This filter removes debris and some impurities but does not eliminate all bacteria or viruses. If possible -Boil the water afterward or add a point of use water treatment if available to make it safer to drink.
• This filter removes debris and some impurities but does not eliminate all bacteria or viruses. If possible -Boil the water afterward or add a point of use water treatment if available to make it safer to drink.
This method is a basic survival technique and works best with clear water sources.


